
7 Steps to card design

Creating your card design is one of the most important aspects of artwork. Cards are unique and special to us, and our business and everyone wants a card that makes their company look good.
Many people do not know how to begin with artwork designs and find it daunting. That is why we are here to help.
You can design:
- Business cards
- Membership
- Loyalty
- Payment
- Retail
- Smart
Why do we need artwork?
Artwork allows us to produce excellent quality printed cards up to your standards. You are allowing your business to stand out from the crowd.
Artwork ensures that our requirements are met, and you can enjoy a hassle-free production order with cards delivered on time - no need to do any unnecessary reprints.
Before sending through your cards, you need to follow these seven simple steps.
Step 1: determine which design software you will use.
Many design software out there can help you design your cards. They vary from being free to expensive. What is most accessible and more affordable will determine which software you choose.
Here are the options:
Many people use Adobe because it is an easy platform to use, but it is expensive if you are not a designer.
We have provided a support video on free software that allows you to design your artwork online for free with our requirements.
Alternatively, we use affinity publisher, which is very similar to adobe but is much more affordable. This design software is easy to use and follows our requirements before print. We have also made a video for you to follow on this.
Affinity Publisher and Adobe allow you to design your cards with variable data. You can have multiple staff members' information and still create your card to look the same, saving you time and effort.
However, if you find these too difficult to follow, Word is an easy platform to use, but it does not allow you to create multiple cards at a time. You will have to fill in all of the information manually, which may be time-consuming.
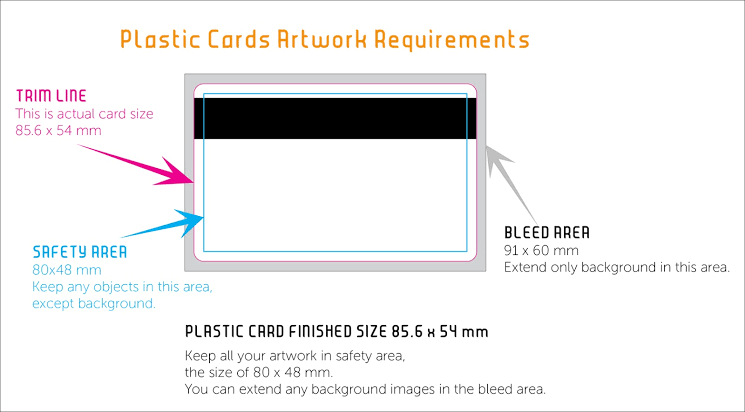
Make sure to select the design where your artwork is 85.6mm x 54mm, including a bleed of 3mm. Here you can make sure that your design is fitted to our requirements and printed correctly.
Step 2: CMYK

Print your cards in CMYK. Please ensure all artwork is provided in CMYK format. Files supplied in RGB form will be converted into CMYK before print and may result in significant colour differences from what you see on your computer. By designing in RBG you will not get the same colour design, and your cards may come out differently from how you saw them on the computer.
If you have done a previous job with us, ensure that the colour pallet is the same and select CMYK. We will double-check that you have done this to make sure you get beautifully printed cards.
You can request a hard copy sample before printing the whole job to see that you are happy with the colours; this may make it easier to visualise your cards.
Step 3: safe zone

We refer to the ‘safe zone’ as the bleed area. Bleed is a buffer zone around the edge of your card design where any background elements that touch the edge of the page can be cut off.
Printers generally can't print to the very edge of the plastic. Instead, they print on a larger plastic sheet and then trim it down to the correct size (CR80), allowing for slight inaccuracies.
Cutting through that buffer of colour will avoid leaving any thin white strips along the edge of your print.
Before sending us the artwork, ensure your card has a ‘safe zone‘ around the card. Keep all text and content at least 3mm away from the edge of the document; any text outside the 'safe area' may be cut off.
Please keep in mind that the corners are round and need an extra 1mm safe zone.
Step 4: fonts

When designing your cards, you will use the font that your company uses to keep with your brand's style. Ensure all fonts are 'embedded 'in the card design.
Whilst we have an extensive font collection, there is no guarantee that the version you have used matches ours. If your fonts aren't embedded, our system may substitute the font for a different one, which could mess up your beautiful design.
If you struggle to outline/ convert the fonts, you can always send the fonts with your artwork. We will load the fonts to our system, and there will be no issues.
Step 5: images
Ensure all images and graphics are above ‘300dpi‘. If your images look ‘pixelated’ or fuzzy on screen, then the chances are it’s not quite good enough quality for professional printing. You do not want your cards to be printed with a fuzzy picture; for best results, use vector-based graphics. Pexels or Unsplash are great for backgrounds.
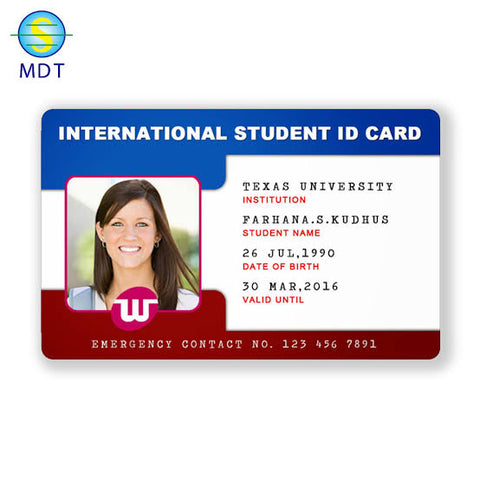
If you’re creating a photo ID, take photos with a proper camera or look at our webcam selection. This video will show you how to take a good photo using your webcam.
Step 6: border

Sadly the use of borders near edges can result in lopsided cards, and we wouldn’t want that, so avoid them as much as possible. Y You will already have placed a bleed around your card, which is enough to ensure that your design will fit perfectly on your card, including photos for ID cards.
When designing an ID Card, please remember that we cannot include a border around the photo unless the photos are all the same size. All of the images must have a frame around them if you continue with the design.
If they are not all the same size, the photo might not fit perfectly in the border, and the background artwork might show between the edge of the image and the borderline.
Step 7: additional features or add ons.

Hole Punching

If you’d like hole punching, then there are two styles of punches available in three locations of your card. Please allow space in your layout for the punch or crucial information that could be lost from your card.
The hole punches can place in the centre of the long or short side. Place the holes 5mm from the edge of the card, 5mm from the long edge and 7mm from the short edge of the card.
Please inform us of the hole punches you would like on your card before sending us the artwork. If you’re unable to do it yourself, add it as a special requirement at the bottom of your artwork.
Magnetic Stripe
Please allow for placement of the magnetic stripe 5mm from the top of the card. The strip is 12.5mm tall. You do not need to add a black box to your artwork but should allow its placement, which means that you should not put any text, image or feature at that place.
Please leave it blank and add a particular requirement at the bottom of your artwork.
Signature panels
Signatures are a great feature of your card; it is an important security feature for companies. For example, a merchant can compare the signature panel on the card to the customer's receipt. If the signatures do not match, the merchant can stop the transaction.
Standard panels can be placed 3mm or lower from the magnetic stripe. There are three sizes in our Standard Range, with custom panels also available.
- The large panel is 84 x 10mm,
- The full-length panel is 75mm x 7mm,
- Short length panel is 48mm x 7mm.
Please stipulate which panel you would like in the special requirements under your artwork.
Embossing
Embossed is a feature that allows for raised letters. The letters are available in a size 12 or 16 font, with a maximum of 25 characters per line (including spaces).
There are three different foil colours for embossing
- Black
- Silver
- Gold.
We recommend no more than three embossing lines to reduce warping; this may damage your card and cause it to be less appealing.
Alphanumeric characters are ideal. A select number of characters are available, including
- Full stops
- Comma
- Forward slash
- Apostrophe
- Hyphen
This information stands out and makes your card far more unique.
To ensure you get the best results from your print, we ask all of our clients to review our helpful guide before sending your print-ready artwork to us, ensuring your artwork matches our requirements, and you can enjoy hassle-free production of your order.
Let’s recap
- Adobe Illustrator, Affinity Publisher or free software.
- PDF file formats
- Correct card size: 85.6mm x 54mm incl bleed
- 3mm bleed around the card
- 1mm extra safe zone
- CMYK colours and not RGB
- Good quality images and graphics (300dpi)
- No borders
If you cannot design your artwork and would instead let one of our professionals create it for you. We will send through the design, and you can approve it from there or make some adjustments, with a standard R400.00 fee which will help save you time and extra stress.
For more information about our artwork, please feel free to contact us.
